Firmware
Introduction to Yocto
chargebyte hardware platforms are shipped with pre-flashed firmware including one of the following charging stacks:
EVerest charging stack along with platform specific EVerest modules e.g. CbSystem.
chargebyte’s proprietary charging stack (only available for Charge Control C)
The shipped firmware was created using the Yocto project; an open-source collaboration initiative that provides templates, tools, and methods to help developers create custom Linux-based systems for embedded devices. It supports a wide range of hardware architectures and provides a consistent, reproducible environment for developing, building, and maintaining embedded systems. To get familiar with the Yocto project, you can find all the required information on the project’s website.
Firmware Upgrade
The following sections describe different ways to install a firmware upgrade on your chargebyte product. Please ensure that the power supply is stable during a firmware upgrade. In case of an unsuccessful update or of power loss during the installation of the update, the chargebyte device performs a rollback to the previous stable version of the charging firmware. For more information about the rollback mechanism, see the section Rollback Mechanism. The update is finished when the board is rebooted.
The currently installed firmware version can be checked by reading the content of the file VERSION found under /usr/share/secc.
Download EVerest Firmware Images
EVerest firmware images are released by chargebyte on our meta-chargebyte-everest repository, which is the Yocto layer to build the firmware images. The image files can be found in the “Release” section of the repository. Here you can find the latest firmware images and also older released versions.
Note
Please read the release notes of the firmware image before downloading and installing it. In the release notes you can find information about the changes and new features of the firmware image and also the version information which EVerest release the firmware image is based on. This information is especially important if you build up your cross-compile environment as described in Cross-compiling EVerest Modules. Please check that your cross-compile environment is using the same EVerest release as the firmware image you want to install.
Release Images vs Development Images
There are two types of firmware images available for chargebyte devices:
Release images are optimized for deployment and contain only the components required to run the system. Their smaller size reduces download and installation times and leaves more storage space available on the target device for customer-specific applications, services, and data. These images are tested and verified by chargebyte and are recommended as the basis for deployed systems.
Development images contain the same runtime environment as release images, but additionally include development packages such as libraries and header files. They are intended primarily for development workflows that use the target filesystem as a sysroot for cross-compilation and for building customized software components. Because of the additional development content, these images are significantly larger than release images.
Device Access
There are different possibilities to access the device for configuration or update purposes. Please look at section Connecting via SSH or Serial Interface for further details.
Determine current Firmware Version
Connect to the board via SSH or Debug UART
Run the following command via console:
cat /usr/share/secc/VERSION
Update via USB
Preparation of the USB update
Download the firmware update image file onto your workstation.
Plug a USB flash drive into your workstation.
Format the USB flash drive as EXT2/3/4, FAT16/32, exFAT or NTFS.
Copy the firmware update image file (
*.image) onto the USB flash drive’s root directory.
Please note that you should not place multiple *.image files onto the root folder of the USB flash drive, since it is not guaranteed in which order the files are tried and applied.
Updating the Firmware
Connect the board to the power supply.
Wait until the board is booted.
Connect to the board via SSH or Debug UART to backup all your own implementation, configuration and databases files.
Plug in the USB flash drive with the Firmware Update Image file in the USB port of the board.
Observe the LED update indications and wait until the whole firmware update and reboot process is finished. It takes up to 5 minutes.
When the firmware update process is finished and the USB flash drive can be unplugged.
Update via SSH and SFTP
Connect to the board via SSH (e.g. PuTTY).
Backup all your own implementation, configuration and databases files if necessary.
Transfer the update image file via SFTP to the board and store it in the directory
/srvwith e.g. filename my-update.image. On Windows systems you can use e.g. WinSCP or Filezilla.Run the following command via SSH console:
rauc install /srv/my-update.image.The update process should start and report progress and success via console messages.
Reboot into the new system by running the following command via SSH console:
reboot.Re-login into the new system and delete the file
/srv/my-update.image.
Update via SSH or Serial Console and HTTP or FTP
Connect to the board via SSH (e.g. PuTTY) or serial terminal.
Backup all your own implementation, configuration and databases files if necessary.
Place the update image file on a HTTP or FTP server which is reachable via network by your chargebyte device.
Note the URL of the download. In case authentication is required, you must provide the credentials in the URL, e.g.
http://username:passwd@my-site.com/update.image.Run the following command via SSH console:
rauc install <url>, where you replace the URL with your actual URL.The update process should start and report progress and success via console messages.
After success, reboot into the new system by running the following command via SSH console:
reboot.
Update via OCPP
The firmware update via OCPP commands UpdateFirmware and FirmwareStatusNotification is implemented. Such an update via OCPP automatically triggers a reboot of the charge point after successfully installing the new firmware. The central system is notified about the successful installation before the reboot of the charge point.
Support for casync based Firmware Updates
As mentioned in the previous sections, the firmware update mechanism uses RAUC as update framework. The traditional method of updating a device is that a big firmware update image file is transferred to the device and then installed. However, this approach is sometimes not ideal, for example when during different firmware releases only few parts changed. To address such scenarios, RAUC itself supports casync based bundles. For more details, please refer to RAUC’s own documentation: https://rauc.readthedocs.io/en/latest/advanced.html#rauc-casync-support. It is obvious that such kind of firmware updates require an established Internet connection (or a locally available HTTP/FTP server which can be reached by the charging station) - but the concept does not work for USB pen drive firmware updates.
On casync-enabled chargebyte firmware versions, it is possible to pass a URL referring to a casync firmware update image directly to the RAUC framework via rauc install <URL>. Please remember that RAUC will use the passed URL to construct a base URL for accessing the smaller chunks. For example the URL http://example.com/update.raucb would lead to the assumption that all chunks can be accessed via the base URL http://example.com/update.castr/. Note, that the chunk store is a whole directory with many small files inside, not a simple file - the file extension like directory naming might suggest this.
Partitioning
The internal eMMC storage of a chargebyte device is divided into several partitions. The main aim is to have two independent systems available, i.e. system A and system B. This allows firmware updates to run in the background while normal charging operation continues, and then switches to the updated system with a fast restart of the device. This also supports a rollback mechanism in case of failures during firmware updates. In other words, during a firmware update, the active root file system switches from A to B or vice versa, leaving the other as the rollback system.
Partition |
Size |
Description |
|---|---|---|
/dev/mmcblk0p1 |
1 GB |
Root file system A |
/dev/mmcblk0p2 |
1 GB |
Root file system B |
/dev/mmcblk0p3 |
1.3 GB |
Extended Partition Container |
/dev/mmcblk0p5 |
1 GB |
Data Partition (/srv). This partition can be accessed by both root file systems and will not be changed during the update process. |
/dev/mmcblk0p6 |
128 MB |
Logging file system A (/var/log) |
/dev/mmcblk0p7 |
128 MB |
Logging file system B (/var/log) |

Fig. 13: Filesystem Mountpoints
Updating from chargebyte’s proprietary charging stack to EVerest-based charging stack
The following information is important when updating from chargebyte’s proprietary charging stack to EVerest-based charging stack:
Please ensure that you have at least installed chargebyte's proprietary charging stack v3.x.x, before switching your board to EVerest and that this firmware booted once before the update. Latest firmware can be found here: Legacy software stack “Truffle”.
Before updating to EVerest, ensure that you have the correct signing key configured. In order to pass the internal validation process of the RAUC firmware update mechanism, the developer key must be set in the
"/etc/rauc"directory.Check the key:
ls -l /etc/rauc
The symbolic link
"keyring.pem"should point to"i2se-devel.crt":lrwxr-xr-x 1 root root 14 May 13 15:21 keyring.pem -> i2se-devel.crt
If it doesn’t point to the correct file, update the link to the developer key:
cd /etc/rauc
ln -sf i2se-devel.crt keyring.pem
A note about configuration files: When updating from chargebyte’s proprietary charging stack to this EVerest-based charging stack, the configuration files (e.g. the
"/etc/secc/customer.json") are not preserved and you start with a basic, default EVerest configuration. It is therefore inevitable that EVerest must be reconfigured after starting the board. In the worst case EVerest stack does not start up correctly. Also note, that the return path from EVerest to chargebyte’s proprietary charging stack (when doing a firmware update) is affected: since the EVerest configuration files differ significantly from chargebyte’s proprietary ones, such an update process cannot keep any configuration and uses factory defaults.The update process of a chargebyte EVerest image also copies important files and directories (like the root password and the network configuration) from the current file system to the new system. These are listed in the section Firmware Update Considerations.
Files that are stored under
"/srv"are retained during the update process.After the update has been completed, you can use the command
"rauc status mark-active other && reboot"to switch back to the chargebyte proprietary software. However, this only works as long as the partition with chargebyte’s proprietary charging stack has not been overwritten with another firmware image.
Firmware Update Considerations
During a firmware update, several configuration files and runtime data files are copied over from the current/active system partition to the partition with the newer/updated system.
To migrate single configuration keys of a YAML-based EVerest configuration file, chargebyte has
introduced a migration mechanism. This mechanism allows migrating single configuration keys from one
release to another. The migration mechanism is based on Bourne shell scripts (ending in “.sh”) which
are placed in the directory "/usr/libexec/everest/migration.d/". These scripts are executed before
the launch of the EVerest stack. Please see the initial scripts in that location for how to ensure
that they only get executed once.
Since the EVerest configuration allows customers to configure paths to many configuration files freely, should keep in mind that only the following files and directories are handled automatically during a firmware update:
File/Directory |
Description |
|---|---|
file: |
EVerest configuration file |
file: |
OCPP 1.6 configuration file |
directory: |
User specific configuration files. The config file must have the same name as in the parent directory (“config.yaml”). |
directory: |
Certificates directory, mainly for TLS and Plug&Charge |
directory: |
OCPP databases |
directory: |
Network configuration |
file: |
Hostapd configuration |
file: |
Copies only the root password |
file: :directory: |
Mosquitto configuration files |
A complete list of copied files and directories during a firmware update can be found in the “meta-chargebyte-everest” github repository in the bundles/core-bundle/post-install.d directory.
Note
Please take special care of the following EVerest module configuration keys, ensuring that they point to file system locations which are saved as listed above.
EVerest Module |
Configuration Key |
Recommended Content |
|---|---|---|
OCPP |
ChargePointConfigPath |
|
OCPP |
UserConfigPath |
|
OCPP |
DatabasePath |
|
OCPP201 |
CertsPath |
|
OCPP201 |
CoreDatabasePath |
|
OCPP201 |
DeviceModelDatabasePath |
|
Note
It is assumed that only either OCPP or OCPP201 module is operational at the same time.
Note
Please note, that in case /etc/everest/config.yaml is a symlink, after a firmware update
it is resolved and created as plain file on the updated system.
Rollback Mechanism
The internal storage of chargebyte devices is subdivided into several partitions. This forms a redundant setup with systems A and B, where one system is active and running while the other is inactive. This allows the inactive system to be updated in the background without interrupting the main operation. After a firmware update is performed and the system boots into the new firmware, the previously active system still exists, but is now inactive. It will be used for future firmware updates, and immediately after an update, it serves as a fallback option. This is possible because it can be safely assumed that the previously active system is still in a recent state or at least not in a worse condition than before the firmware update.
The process of using the previous system as a fallback after a firmware update is called the rollback mechanism. Several software components must work together to provide this feature. The main purpose is to ensure that after a firmware update is installed, all software components run smoothly, even with the restored/retained configuration files of the previous system.
How it works
As mentioned, the filesystem architecture of chargebyte devices consists of several partitions. During the manufacturing process, two of these partitions are flashed with the same firmware version of the charging software, and both would be bootable per se. After initially starting the board, only the first partition (rootfs A) is activated and used by the bootloader to complete the boot process. When this boot process reaches the point at which it considers itself to be in a known-to-be-good state, it disables the other partition (rootfs B).
The rollback mechanism is activated only while performing a firmware update on chargebyte devices. After starting the update process, the update image file will be installed to the other, currently deactivated partition. The currently booted rootfs filesystem remains unaffected during the update. As soon as the update is successfully installed, the currently booted partition is deactivated. Depending on the update method used, a reboot may occur immediately, such as during an update from a USB pen drive. The bootloader is then responsible for booting the partition with the new firmware image. After successfully starting the charging software, the rollback mechanism is deactivated, and the charging software is fully operational.
But in case something went wrong during the update, the boot process will not be marked as successful. In this case, the bootloader will switch back to boot the previous system again.
As noted, a successfully booted new firmware will disable the rollback mechanism. On the other hand, if the previous system is booted again - and it can be assumed that this system also boots successfully - the previous system will disable the rollback mechanism. Ultimately, the rollback mechanism is automatically disabled after a firmware update is installed or a rollback is performed. In either case, the device operates with functional firmware, providing a stable base for normal operation and future firmware updates.
However, it is worth mentioning that the partitions are not synchronized. Thus, if one rootfs is customized, such as by integrating custom software applications, the other partition remains unaffected. Only the configuration and certificate files stored in /etc/everest, database files stored in /var/lib/everest as well as custom network device configurations are migrated during the installation of an update. This point must be especially considered before performing a standard firmware update from chargebyte. In the case of customized file system contents, it is recommended to create a customized firmware image update based on the standard update image. For more information regarding the creation of own firmware image updates please refer to section Firmware Update Customization and Signing or contact the chargebyte support.
Performing the Rollback Mechanism Manually
In some situations, e.g., rescuing data of the other partition after a firmware update, it might be necessary to perform a manual rollback to the other partition.
The chargebyte device uses the RAUC update framework for updating the device with a new firmware version and managing the boot partitions. Before using RAUC command line tool, it is necessary to establish a connection via SSH or Debug UART. After the connection is established, the status of the RAUC managed partitions can be retrieved by using the rauc status console command. The following figure shows the console output of the RAUC status command. Here the board was booted from the first partition “rootfs.0” (A).
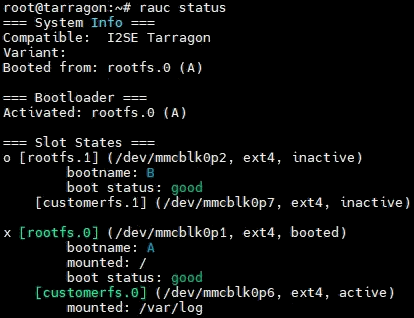
Fig. 14: Console output of the “rauc status” command
The rollback to the other partition can now be performed by using the command rauc status mark-active other. The console output should now look like the following figure.
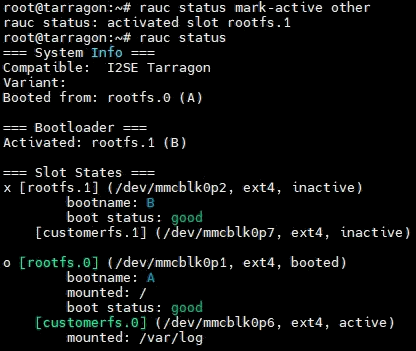
Fig. 15: Console output of the “rauc status mark-active other” command
After rebooting of the board with command reboot the board should be successfully booted on the other partition. To revert to the initial partition, just repeat this process.
Mount Inactive Partition
During development it may be useful to access/mount the inactive partition. Then it is required to first determine the inactive partition using rauc command line tool. To simplify things, a helper shell script is included in the firmware which is called mount-other-rootfs. It takes one command line argument as parameter, that is, a target directory used as mountpoint for the inactive root filesystem.
mount-other-rootfs /mnt
Note, that this helper script does not modify any RAUC status information regarding this slot.
Firmware Update Customization and Signing
After making sure that the customized software is working on the board, there might be the requirement to pack this with our pre-flashed firmware to create your own firmware update file which should be signed. This facilitates the production process. The following steps illustrate how to create your own signed firmware update image. For this you would need a native Linux machine or a Linux virtual machine which includes the tool “RAUC”. RAUC is the framework we use for performing our firmware update. During the steps, the tool will be used to extract our firmware image, re-pack it including your customized software and sign the new firmware update image. Note that you need your own Public Key Infrastructure (PKI) to sign firmware update images later.
Steps:
Download chargebyte’s digital certificate found on our website which is used to validate distributed firmware update images.
Use the latest firmware image. How to download the firmware image is described in the section Download EVerest Firmware Images.
Download and install RAUC tool for the host environment; follow the guide here: https://github.com/rauc/rauc/#user-content-prerequisites . It is also possible, that your Linux distribution already ships with pre-compiled packages which just need to be installed with your package management system. In this case, you can skip this step.
sudo apt-get install build-essential automake libtool libdbus-1-dev libglib2.0-dev libcurl3-dev libssl-dev libjson-glib-dev
git clone https://github.com/rauc/rauc
cd rauc
./autogen.sh
./configure --prefix=/usr
make
sudo make install
cd ..
Create your own PKI if you do not have one already (see https://rauc.readthedocs.io/en/latest/advanced.html#security).
Extract the root filesystem image shipped by chargebyte from the firmware update image file. Note that the directory “bundle-staging” will be created, and the content of the firmware update image file will be extracted into it.
rauc extract --keyring=<chargebyte_certificate>.crt <shipped_firmware>.image bundle-stagingNote
- Alternatively, if the above command does not work, you can use the following command:
unsquashfs -d bundle-staging <shipped_firmware>.image
But this will not verify the signature of the firmware image.
Mount the ext4 root filesystem image as a loop device.
sudo mkdir -p /tmp/rootfs
sudo mount bundle-staging/core-image-minimal-tarragon.ext4 /tmp/rootfs -o loop
Modify and extend the root file system image with your customized software by changing the files/directories below the mountpoint.
Install your PKI certificate which is used later during firmware updates to verify your firmware update file. For this step you need to copy your PKI certificate, created in step 4, and place it under
/tmp/rootfs/etc/rauc/. Then, replace the/tmp/rootfs/etc/rauc/keyring.pemsymlink with your PKI certificate.
cp <your_CA_certficate>.crt /tmp/rootfs/etc/rauc/
cd /tmp/rootfs/etc/rauc/
ln -sf <your_CA_certficate>.crt /tmp/rootfs/etc/rauc/keyring.pem
Copy your additional files, software components etc. from your developer board into this corresponding directory below
/tmp/rootfs.
Unmount the loop device with
sudo umount /tmp/rootfsMake sure that the customized filesystem is in a clean state. This is important since otherwise, the installation process and/or the production process would fail.
fsck.ext4 -f bundle-staging/core-image-minimal-<platform>.ext4This step only needs to be done, if you want chargebyte to initially flash your own firmware during the manufacturing process of the chargebyte boards.
Create MD5 hashsum of the file with the following command. This hash is used during production process to ensure that the image file is not altered but installed correctly into flash. Please send us this hash.
md5sum bundle-staging/core-image-minimal-<platform>.ext4Pack your modified root filesystem image into a firmware update file. The firmware update file must be signed with your PKI using the RAUC tool.
rauc bundle --keyring=<your_CA_certficate>.crt --key=<your_key>.key --cert=<your_certificate>.crt bundle-staging <your_firmware_update>.imageTest the firmware update image file. On the test board, transfer your PKI to the board via SFTP to
/etc/raucfolder so that the board accepts your firmware updates. The symbolic link refers originally to our chargebyte certificates, so you probably would need to change this. Once finished, the system should be rebooted.cd /etc/rauc ln -sf <your_CA_certficate>.crt /etc/rauc/keyring.pem reboot
Transfer your newly created firmware update image
<your_firmware_update>.imagevia SFTP to/srvfolder on your test board.Install the image via SSH or debug UART with the command
rauc install /srv/<your_firmware_update>.image. Wait until the update is installed and reboot the test board.
Board Customization with USB
For easier customization of the boards, such as modifying configuration files or updating to new customized firmware, a USB flash drive can be used. This is a two-step process. In the first step, chargebyte’s /etc/rauc/keyring.pem is replaced with the customer’s CA certificate. This step is also done automatically when you insert a USB flash drive into the board’s USB port. In the second step, a script that you need to write is triggered automatically to perform the desired customization on the board. Below is a description of how this feature behaves and the requirements that must be fulfilled for a successful process.
Replacement of /etc/rauc/keyring.pem
Send us your public CA certificate so that we can sign i.e. cross-sign it for you with our certificates.
On a USB flash drive, place your cross-signed CA certificate together with the corresponding signature file. The pair has to be named as follows:
fwupdate-keyring.pem&fwupdate-keyring.pem.p7s. You would get this pair from us as a result of step 1.Insert the USB flash drive in the USB port of the board. The following behavior will be triggered automatically:
The onboard yellow diagnostics LED is turned on to indicate the detected USB flash drive.
It is checked whether the pair
fwupdate-keyring.pemandfwupdate-keyring.pem.p7sexist on the USB flash drive.It is checked whether
fwupdate-keyring.pemcontains at least one X.509 certificate.It is checked whether the signature of
fwupdate-keyring.pemis valid against the current certificate found in/etc/rauc/keyring.pem. This is originally a symbolic link referring to our CA certificates. Therefore, step 1 is needed.If the verification has succeeded, the current
/etc/rauc/keyring.pemwill be deleted, and the content offwupdate-keyring.pemis saved as new/etc/rauc/keyring.pem. From this point in time, this new certificate is active for all later uses, i.e. further customizations but also regular firmware updates.
Performing Customization through autorun.sh
This assumes that the first step has successfully ended, and the file /etc/rauc/keyring.pem now contains your CA certificate. However, this will also work later at any time, as long as the CA certificate matches to the script signature.
Write a script that contains the customization you want to do. This has to be named
autorun.sh.Sign it by your key and certificate. The resulting signature file must be named
autorun.sh.p7s.Place the key and certificate pair on a USB flash drive and insert it in the USB port of the board. The following behavior will be triggered automatically:
It is checked whether the pair
autorun.shandautorun.sh.p7sexist on the USB flash drive.It is checked whether the signature of
autorun.shis valid against the current certificate found in/etc/rauc/keyring.pem. Remember, this now usually contains your CA certificate.If the verification has succeeded, the current working directory is changed to the mount point where the USB flash drive was mounted, and the
autorun.shscript is executed by means of/bin/sh. The changed working directory should make it easier to reference files you want to install from the USB flash drive.
Notes
If a
rebootis called within theautorun.shscript, this will not end the execution of the script immediately, but the upcoming lines of the script will continue to be executed until the reboot command is propagated through the system.Every time the USB flash drive is inserted or a reboot is performed, a re-execution of the customized
autorun.shscript will be prevented if it has not been changed. This does not depend on the success of the script, i.e. the return value of the script. This is done by saving the MD5 checksum ofautorun.shfound on the USB flash drive in the file/var/cache/usb-autorun/executed.list. This behavior can be controlled inautorun.shby e.g., removing theexecuted.listfile completely or just deleting single MD5 checksums from it.Please keep in mind, that certificate verifications are done without time checking since it cannot be ensured that the device has a valid date/time at the moment when you want to use this feature.
To sign
autorun.shand getautorun.sh.p7sas a signature file, the following commands can be used - typically on a Linux developer host system:openssl smime -sign -outform DER -binary -inkey <your-releasemanager-key>.key -signer <your-releasemanager-certificate>.crt -in autorun.sh -out autorun.sh.p7sTo verify
autorun.shagainst your CA certificate, the following command can be used:openssl smime -verify -no_check_time -inform DER -CAfile <your_CA_certificate>.crt -content autorun.sh -in autorun.sh.p7s