Getting Started
This chapter is intended to help you get started as easily as possible with EV charging together with the Charge Control C and the EVerest charging stack. For this purpose, a basic AC PWM charger is set up as an example and explained step by step.
Setting Up the Hardware
Hardware Components
The following hardware components are required to set up the basic AC PWM charger:
Charge Control C
12 V DC Power Supply
Power Contactor
IEC 62196 Type 2 three-phase EV charging socket outlet
Ethernet cable for SSH connection or USB to serial adapter for serial connection
IEC 62196 Type 2 EVSE Test Adapter (e.g. Metrel or Benning) to simulate the EV
Wiring material
Hardware Overview
Warning
Before you start setting up the hardware, please read the Safety Notes.
The following figure shows the basic setup of the AC PWM charger with the Charge Control C:

Figure: Basic Setup of the AC PWM Charger with the Charge Control C
Note
The pin assignment of the Charge Control C can be found in the Board Connections section.
Note
Before you start setting up the hardware, please check whether the HW components used are also listed in Hardware Components section.
First Startup
Boot Process
Here are some key points about the boot process of the Charge Control C:
The file system basically consists of three ext4 partitions. Two partitions are used as slots for the RAUC update process. The third partition is not touched by the RAUC update process and is usually used for storing update bundles, logs, etc. For more information about the firmware in general, firmware updates and the partition layout, see the Firmware chapter.
After connecting the Charge Control C to the power supply, the U-Boot bootloader starts the currently active slot managed by RAUC.
The LED status indicators on the Charge Control C provide information about the current status of the boot process.
EVerest is automatically started with the default configuration of chargebyte after the boot process is completed. The initial configuration is explained in the Initial Configuration section.
Understanding LED Status Indicators
Now you can plug in the Charge Control C to the power supply. The LED status indicators on the Charge Control C provide information about the current status of the boot process. The following table shows the meaning of the LED status indicators:
State |
LED indication |
Behavior |
|---|---|---|
Bootloader active |
LED1 (green) |
off |
LED2 (yellow) |
off |
|
LED3 (red) |
permanently on for approx. 3 sec. |
|
Boot process running |
LED1 (green) |
blinking for approx. 15 sec. |
LED2 (yellow) |
off |
|
LED3 (red) |
blinking |
|
Operating system running |
LED1 (green) |
permanently on |
LED2 (yellow) |
off |
|
LED3 (red) |
blinking |
Connecting via SSH or Serial Interface
For debugging, there are two ways to connect the developer computer to the Charge controller: via SSH or via serial interface. The following sections explain how to connect to the Charge controller using PuTTY. You can also use other terminal programs (like e.g. MobaXTerm) to connect to the Charge controller.
SSH Connection with PuTTY
Here are the steps to connect to the Charge controller via SSH using PuTTY:
Install PuTTY on your computer. You can download PuTTY from the following link: PuTTY Download.
Connect the Charge controller over Ethernet to your computer.
Start PuTTY and enter the IPv4 fallback address “169.254.12.53” of the Charge controller in the “Host Name (or IP address)” field (See figure PuTTY SSH Configuration).
Click on “Save” to save the configuration and then click on “Open” to start the connection.
A PuTTY Security Alert window will appear. Click on “Accept” to continue.
Enter the username “root” and the password “zebematado” to log in to the Charge controller.
Note
The username can also be stored under “Connection -> Data -> Auto-login username” in the PuTTY configuration.
Note
It is also possible to install an SSH key on the Charge controller to log in without a password. Please look online for instructions on how to do this on a Linux system.
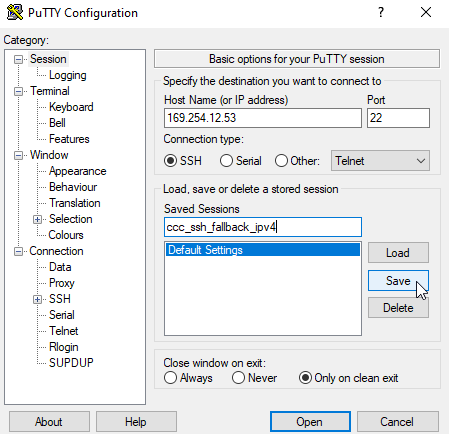
Figure: PuTTY SSH Configuration
Serial Connection with PuTTY
Here are the steps to connect to the Charge controller via serial interface using PuTTY:
Install PuTTY on your computer. You can download PuTTY from the following link: PuTTY Download.
Connect the Charge controller to your computer via USB to serial adapter.
Start PuTTY and configure the COM port of the USB to serial adapter (e.g. “COM1”) in the “Serial line” field. Note: You can find the COM port of the USB to serial adapter in the Windows Device Manager under “Ports (COM & LPT)”.
Switch to Connection -> Serial configuration and set the “Speed” to 115200, “Data bits” to 8, “Stop bits” to 1, “Parity” to “None” and “Flow control” to “None” (See figure PuTTY Serial Configuration).
Switch back to the “Session” and click on “Save” to save the configuration (See figure PuTTY Save Serial Connection).
Click on “Open” to start the connection.
Now a black window will appear. Press enter to get the login prompt.
Enter the username “root” and the password “zebematado” to log in to the Charge controller.

Figure: PuTTY Serial Configuration
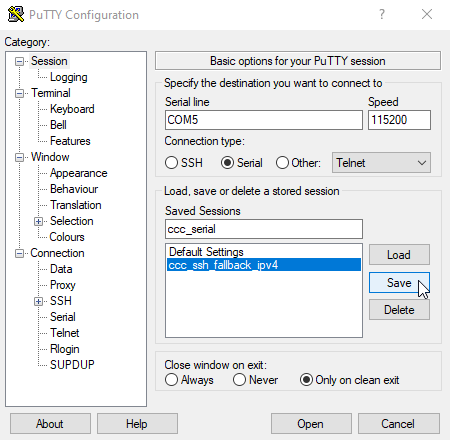
Figure: PuTTY Save Serial Connection
Firmware Update
Before you start the initial configuration of the Charge Control C, it is recommended to update the firmware to the latest version. The firmware update process is explained in the Firmware Upgrade section. If necessary, please update the firmware to the latest version.
Note
How to download the firmware image is described in the section Download Firmware Images.
Note
Before installation of a chargebyte EVerest image, please check whether you are installing a developer or release image and prepare the Charge Control C accordingly. How to do this is explained in the Release Images vs Development Images section.
Note
In case you are updating from a chargebyte proprietary image to a chargebyte EVerest image, please read the Updating from chargebyte’s proprietary charging stack to EVerest-based charging stack section carefully.
Initial Configuration
Now you are connected to the Charge Control C and we can take a deeper look at the initial configuration.
The configuration files of the EVerest charging stack are stored in the directory “/etc/everest”. EVerest uses the YAML format for the configuration files. EVerest runs as a systemd service that by default uses “/etc/everest/config.yaml” as a configuration setup. If you take a look at the content of the configuration file, you will see that it is only a reference to the “bsp-only.yaml” file.
Note
If you create an own configuration file, you can also store it in the “/etc/everest” directory and create a symbolic link to it like “ln -sf /etc/everest/my-config.yaml /etc/everest/config.yaml”.
root@tarragon:/etc/everest# ls -l /etc/everest/
total 28
-rw-r--r-- 1 root root 1134 Jun 20 07:45 bsp-only.yaml
lrwxrwxrwx 1 root root   14 Jun 25 19:26 config.yaml ->  my-config.yaml
Let’s take a look at the content of the bsp-only.yaml configuration file. This file is already prepared for the basic AC PWM charger setup.
Just type “less /etc/everest/bsp-only.conf” to see the content of the configuration file:
 1#
 2# This example configuration can be used as bare minimum starting point:
 3# no support for plug lock, no additional peripherals (RFID, meter...)
 4#
 5active_modules:
 6  api:
 7    module: API
 8    connections:
 9      evse_manager:
10        - module_id: connector
11          implementation_id: evse
12  tarragon_bsp:
13    module: CbTarragonDriver
14    config_module:
15      contactor_1_feedback_type: none
16      relay_2_name: none
17  tarragon_dig_in_ref:
18    module: CbTarragonDIs
19  connector:
20    module: EvseManager
21    config_module:
22      connector_id: 1
23      has_ventilation: false
24      disable_authentication: true
25    connections:
26      bsp:
27        - module_id: tarragon_bsp
28          implementation_id: evse_board_support
29  energy_manager:
30    module: EnergyManager
31    connections:
32      energy_trunk:
33        - module_id: grid_connection_point
34          implementation_id: energy_grid
35  grid_connection_point:
36    module: EnergyNode
37    config_module:
38      fuse_limit_A: 16
39      phase_count: 3
40    connections:
41      energy_consumer:
42        - module_id: connector
43          implementation_id: energy_grid
In general, the EVerest charging stack consists of different modules, each of which fulfills a specific task. An EVerest module provides and requests interfaces. The configuration file shows which EVerest modules are activated, how they are configured and how they are connected to each other over the interfaces. The following figure illustrates how the EVerest modules are connected to each other:
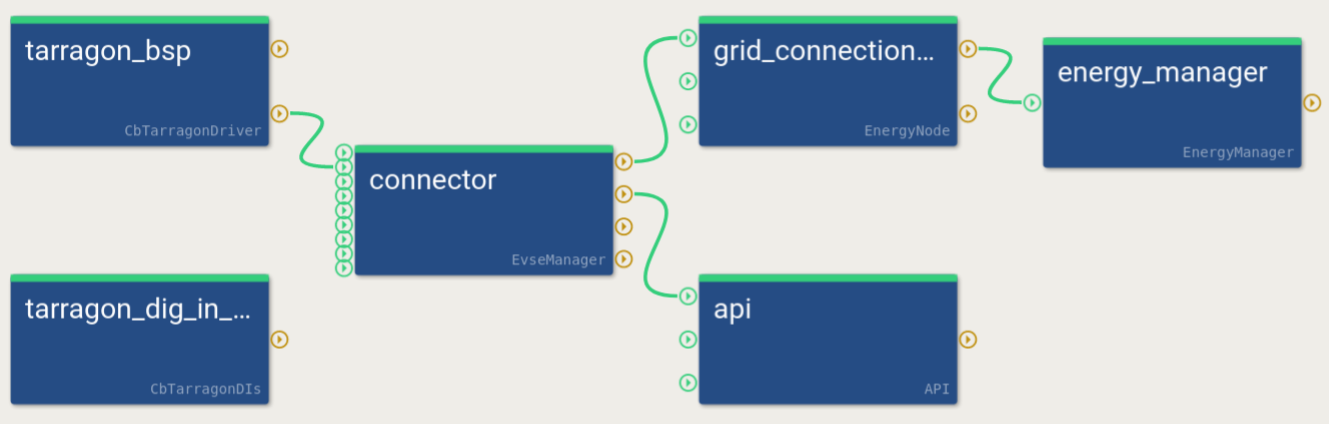
Figure: EVerest admin panel view of the bsp-only.yaml configuration
However, not all configuration parameters of the modules are shown here. Only the configuration parameters that do not match the default configuration of the respective module need to be specified here. Depending on the installed hardware components, the configuration file may need to be adapted. The hardware related tasks are mainly handled by the CbTarragonDriver module. The configuration of the CbTarragonDriver module can be found in “/usr/libexec/everest/modules/CbTarragonDriver” directory.
Each module has a specific configuration file. This file is called “manifest.yaml” and is stored in the main directory of the module. Here you can also see all other configuration parameters of the respective module. Now please type “less /usr/libexec/everest/modules/CbTarragonDriver/manifest.yaml” to see the content of the configuration file and check whether the configuration fits to your hardware setup.
If you want to change a configuration parameter of a module, which is not part of your EVerest YAML configuration file, just copy the specific configuration key from the “manifest.yaml” file of the module to the module specific “config_module” space in your EVerest configuration and adjust the value. Please note if you change it directly in the “manifest.yaml” file of a module, the changes will be get lost after a software update.
Here is an excerpt of an EVerest configuration to change the parameter “connector_type” to “IEC62196Type2Cable” of the CbTarragonDriver module.
tarragon_bsp:
  module: CbTarragonDriver
  config_module:
    contactor_1_feedback_type: none
    relay_2_name: none
    connector_type: IEC62196Type2Cable
After adjusting the configuration file, you have to restart the EVerest charging stack to apply the changes. Just type “systemctl restart everest” to restart the EVerest charging stack.
Note
You can also use the EVerest admin panel to adjust the EVerest configuration in a GUI. This tool must currently be installed manually on your developer computer, because the resources on the board are limited.
Note
If you have made a mistake in the configuration file, the EVerest charging stack will not start. Therefore, it is recommended to back up the original configuration file before making changes.
Starting and Monitoring the Charging Process
Before we start the first charging session, we shall open the EVerest log to monitor the charging process. The EVerest log is stored in the systemd journal and can be accessed via the journalctl command. The journalctl command provides a lot of options to filter the log messages. Now just type “journalctl -f -u everest -n 50” to see the last 50 log messages of the EVerest charging stack and to follow the charging process in real time.
The EVerest log should look like this:
root@tarragon:~# journalctl -f -u everest -n 50
2024-06-19T19:26:08.986317+0200 tarragon systemd[1]: Started EVerest.
2024-06-19T19:26:09.079641+0200 tarragon manager[11978]: [INFO] manager          ::   ________      __                _
2024-06-19T19:26:09.086179+0200 tarragon manager[11978]: [INFO] manager          ::  |  ____\ \    / /               | |
2024-06-19T19:26:09.086179+0200 tarragon manager[11978]: [INFO] manager          ::  | |__   \ \  / /__ _ __ ___  ___| |_
2024-06-19T19:26:09.086179+0200 tarragon manager[11978]: [INFO] manager          ::  |  __|   \ \/ / _ \ \'__/ _ \/ __| __|
2024-06-19T19:26:09.086179+0200 tarragon manager[11978]: [INFO] manager          ::  | |____   \  /  __/ | |  __/\__ \ |_
2024-06-19T19:26:09.086179+0200 tarragon manager[11978]: [INFO] manager          ::  |______|   \/ \___|_|  \___||___/\__|
2024-06-19T19:26:09.086179+0200 tarragon manager[11978]: [INFO] manager          ::
2024-06-19T19:26:09.086179+0200 tarragon manager[11978]: [INFO] manager          :: Using MQTT broker localhost:1883
2024-06-19T19:26:09.188450+0200 tarragon manager[11979]: [INFO] everest_ctrl     :: Launching controller service on port 8849
2024-06-19T19:26:09.254120+0200 tarragon manager[11978]: [INFO] manager          :: Loading config file at: /etc/everest/bsp-only.yaml
2024-06-19T19:26:09.818473+0200 tarragon manager[11978]: [INFO] manager          :: Config loading completed in 723ms
2024-06-19T19:26:14.176961+0200 tarragon manager[11997]: [INFO] energy_manager:  :: Module energy_manager initialized [3968ms]
2024-06-19T19:26:14.317279+0200 tarragon manager[12000]: [INFO] tarragon_dig_in  :: chargebyte\'s Tarragon driver for configuration of digital input reference PWM (version: 0.10.0)
2024-06-19T19:26:14.373497+0200 tarragon manager[11998]: [INFO] grid_connection  :: Module grid_connection_point initialized [4076ms]
2024-06-19T19:26:14.373497+0200 tarragon manager[12000]: [INFO] tarragon_dig_in  :: Enabled digital input reference PWM 2084000.pwm, channel 0 with period 40000 and duty cycle 20000
2024-06-19T19:26:14.373497+0200 tarragon manager[12000]: [INFO] tarragon_dig_in  :: Module tarragon_dig_in_ref initialized [4066ms]
2024-06-19T19:26:14.473667+0200 tarragon manager[11995]: [INFO] api:API          :: Module api initialized [4343ms]
2024-06-19T19:26:14.548188+0200 tarragon manager[11999]: [INFO] tarragon_bsp:Cb  :: Control Pilot Observation Thread started
2024-06-19T19:26:14.567183+0200 tarragon manager[11999]: [INFO] tarragon_bsp:Cb  :: Primary contactor feedback type: \'none\'
2024-06-19T19:26:14.568825+0200 tarragon manager[11999]: [WARN] tarragon_bsp:Cb CbTarragonContactorControl::CbTarragonContactorControl(const string&, const string&, const string&, const string&, const string&, const string&, const string&, const string&) :: The primary contactor has the feedback pin not connected. This is not recommended.
2024-06-19T19:26:14.570871+0200 tarragon manager[11999]: [INFO] tarragon_bsp:Cb  :: chargebyte\'s Hardware EVerest Modules (version: 0.10.0)
2024-06-19T19:26:14.573109+0200 tarragon manager[11999]: [INFO] tarragon_bsp:Cb  :: Module tarragon_bsp initialized [4248ms]
2024-06-19T19:26:14.576991+0200 tarragon manager[11999]: [INFO] tarragon_bsp:Cb  :: Contactor Handling Thread started
2024-06-19T19:26:14.650925+0200 tarragon manager[11996]: [INFO] connector:EvseM  :: Module connector initialized [4429ms]
2024-06-19T19:26:14.710204+0200 tarragon manager[11978]: [INFO] manager          :: 🚙🚙🚙 All modules are initialized. EVerest up and running [5638ms] 🚙🚙🚙
2024-06-19T19:26:14.881674+0200 tarragon manager[11999]: [INFO] tarragon_bsp:Cb  :: Read PP ampacity value: None (U_PP: 3297 mV)
2024-06-19T19:26:14.889409+0200 tarragon manager[11999]: [INFO] tarragon_bsp:Cb  :: Proximity Pilot Observation Thread started
2024-06-19T19:26:14.957703+0200 tarragon manager[11996]: [INFO] connector:EvseM  :: Max AC hardware capabilities: 32A/3ph
2024-06-19T19:26:15.164664+0200 tarragon manager[11996]: [INFO] connector:EvseM  :: 🌀🌀🌀 Ready to start charging 🌀🌀🌀
2024-06-19T19:26:15.322579+0200 tarragon manager[11999]: [INFO] tarragon_bsp:Cb  :: handle_enable: Setting new duty cycle of 100.00%
2024-06-19T19:26:15.333875+0200 tarragon manager[11999]: [INFO] tarragon_bsp:Cb  :: CP state change from PowerOn to A, U_CP+: 11947 mV, U_CP-: 7 mV
2024-06-19T19:26:15.459775+0200 tarragon manager[11999]: [INFO] tarragon_bsp:Cb  :: handle_pwm_off: Setting new duty cycle of 100.00%
2024-06-19T19:26:15.632804+0200 tarragon manager[11999]: [INFO] tarragon_bsp:Cb  :: handle_pwm_off: Setting new duty cycle of 100.00%
Before plugging in the IEC 62196 Type 2 EVSE Test Adapter, please make sure that the CP state of the EVSE Test Adapter is set to “B” and the current limit (adjustable via the PP state) is configured to 16A. Now you are ready to start the first charging session with EVerest and you can plug in the IEC 62196 Type 2 EVSE Test Adapter.
After plugging in the IEC 62196 Type 2 EVSE Test Adapter, a CP state change from “A” to “B” should be visible in the EVerest log. By default, the authentication is disabled in the bsp-only.yaml configuration. Therefore, the duty cycle should directly switch from 100% to ~26.7%. The duty cycle change indicates 16A to the EV and the EVSE is now able to supply power to the EV.
The last EVerest log messages should look like this:
2024-06-20T07:45:49.386995+0200 tarragon manager[18942]: [INFO] tarragon_bsp:Cb  :: CP state change from A to B, U_CP+: 9637 mV, U_CP-: -2 mV
Read PP ampacity value: A_16 (U_PP: 3297 mV)
2024-06-20T07:45:49.781308+0200 tarragon manager[18942]: [INFO] tarragon_bsp:Cb  :: handle_pwm_on: Setting new duty cycle of 26.67%
Now the charging process can be started by a CP state change from “B” to “C” via the IEC 62196 Type 2 EVSE Test Adapter.
Note
CP state “D” (EVSE with ventilation) is currently not supported by the CbTarragonDriver module.
After switching the CP state from “B” to “C”, the EVSE contactor should close and the charging process should start. The last EVerest log messages should look like this:
2024-06-21T07:45:50.605759+0200 tarragon manager[5733]: [INFO] tarragon_bsp:Cb  :: CP state change from B to C, U_CP+: 5996 mV, U_CP-: -11817 mV
2024-06-21T07:45:50.766409+0200 tarragon manager[5733]: [INFO] tarragon_bsp:Cb  :: Closing contactor...
2024-06-21T07:45:50.766409+0200 tarragon manager[5733]: [INFO] tarragon_bsp:Cb  :: Contactor state: CLOSED
The charging process can be stopped by a CP state change from “C” to “B” via the IEC 62196 Type 2.
The last EVerest log messages should look like this:
2024-06-21T07:48:04.406373+0200 tarragon manager[5733]: [INFO] tarragon_bsp:Cb  :: CP state change from C to B, U_CP+: 8842 mV, U_CP-: -11826 mV
2024-06-21T07:48:04.641265+0200 tarragon manager[5733]: [INFO] tarragon_bsp:Cb  :: Opening contactor...
2024-06-21T07:48:04.641265+0200 tarragon manager[5733]: [INFO] tarragon_bsp:Cb  :: Contactor state: OPEN
Now the charging process is stopped and the IEC 62196 Type 2 EVSE Test Adapter can be unplugged from the socket outlet. Alternatively, the charging process can be started again by a CP state change from “B” to “C”.
The last EVerest log messages after removing the plug should look like this:
2024-06-21T07:52:51.287007+0200 tarragon manager[5733]: [INFO] tarragon_bsp:Cb  :: CP state change from B to A, U_CP+: 11927 mV, U_CP-: -11970 mV
2024-06-21T07:52:51.368428+0200 tarragon manager[5733]: [INFO] tarragon_bsp:Cb  :: handle_pwm_off: Setting new duty cycle of 100.00%
Congratulations! You have successfully completed your first charging session with the EVerest charging stack and the Charge Control C. Now you are prepared to start your own charging project and adjust your setup to your needs. The following chapters will help you understand the EVerest charging stack and Charge Control C in more detail and gain deeper insight into the configuration.